Make Your Own DIY Beer Advent Calendar
Move over, wimpy chocolate Advent calendars — it’s time for a fun new way to count down the days until Christmas.
We at Drink Philly have heard all the buzz about beer advent calendars and came up with an easy DIY project for all Christmas-loving beer drinkers out there.
First, you need to pick out a base for your calendar. We looked at a few great ideas on Pinterest and decided to go with a plain wooden box. Make sure the box is at least about 10 inches high, 16.25 inches long, and 12 inches wide. This will ensure that 24 bottles fit snugly.
Next was the fun part — picking out paints and decorations! A.C. Moore has a ton of holiday themed items to choose from. We bought red, gold, green and white paints in the spirit of Christmas, but feel free to get creative with it—glow in the dark paint would be pretty great..jpg)
You can also buy glitter glue, snowflakes, bows, dinosaur figurines and various other items you can find at the craft store to decorate your box with.
You’ll also want to get a utility knife, a roll of wrapping paper, sand paper, paint brushes and glue while you’re at the store to use for the later steps. You'll also need 2 large sheets of cardboard that are about 36 x 24 inches each. Make sure the cardboard is pliable, because you will be using this for the top of your Advent calendar where you will be drawing the beers from. If you have cardboard boxes laying around the house, you can use those, but make sure you have enough to cover the dimensions needed.
Step 2: This may be the most important step — the beer!
If you want the beers to be a surprise, send your most trustworthy, beer-loving friend to a local bottle shop with some cash, maybe promise them a share of the bounty when the time comes. Instruct them to pick out 24 unique, festive brews... whatever you like. Have them consult your Untapped profile to pick out some brews you may not have had before. If you have a friend or life partner you’re building the Advent calendar with, purchase 12 beers each and make sure not to reveal your beers to each other, which is very important for step three.
We went to The Bottle Shop on East Passyunk Avenue, which has a lot of winter brews by the bottle, but any bottle shop will suffice. For added fun, head to the liquor store and pick out some mini bottles, a bottle of egg nog or other wintertime liqueurs—just make sure they’ll fit in the base you buy. You can measure your bottles first then go to the craft store after if you plan on going the liquor route.
First, wrap your bottles. If you had a friend pick them out for you have them wrap them so the surprise isn’t ruined. If you bought 12 and a friend bought the other 12, split a roll of wrapping paper, hide in separate rooms and wrap. Place all the finished bottles together so you don't know whose are whose. If you are a terrible wrapper and your friend wraps like Martha Stewart, this option may not work out for you.
Next, you will want to use your utility knife to cut 3 cardboard dividers place inside your box to separate the 4 rows of beers. These don’t need to be perfect since you’ll be closing the box, but they will hold the beers in place.
If you picked out a wooden box that is particularly splintery you can sand it now for an more polished look once it’s painted.
Finally, carefully measure and cut a top piece of cardboard for your box.
It’s time to get creative! Decorate your box however you’d like. As you can see, we went for a traditional Christmas style with snowflakes and candy canes and the like.
You can also paint your cardboard top piece. We used spray paint, but if you don’t have any you can use whatever paints you bought at the craft store.
Once everything is dry, carefully place your bottles in your box. Place the dividers in.
When the cardboard top is dry, flip it over to its back side. Measure the length of the area that your bottles fit into the box and divide that by 6. Measure the width that the bottles take up in your box and divide that by 4. Transpose those measurements onto the cardboard, and draw out 24 matching boxes on the cardboard. Make sure to leave equal space in between the boxes and room on all of the sides.
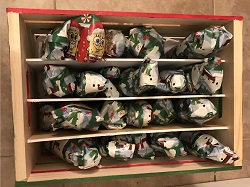
Verify before you begin to cut into the cardboard that your squares are the correct size and large enough for the bottles to fit through. Use your utility knife to carefully cut three sides out of each of the squares creating flaps. Do not cut the top of each square and make sure to leave plenty of room. This step is the trickiest and the extra cardboard may come in handy if you make any mistakes (we did).
Number the flaps on the opposite side of the cardboard in any order you’d like.
Send us your pictures of your beer Advent calendars and use the hashtag #DrinkPhillyAdventCalendar on social media!
Photos via Drink Philly
Tags: Beer, Gifts, Holiday, Photos & Videos


